Craving a sweet treat that won’t heat up your kitchen? Look no further! My No-Bake Chocolate Mint Bars are easy to make and packed with flavor. With simple ingredients like oats, almond flour, and rich chocolate, you can whip these up in no time. Plus, they’re perfect for sharing or enjoying all by yourself. Let’s dive into this delicious, minty treat that will satisfy your sweet tooth!
Why I Love This Recipe
- Easy to Make: This recipe requires no baking, making it perfect for quick preparation without the need for an oven.
- Healthier Indulgence: With wholesome ingredients like oats and almond flour, these bars offer a guilt-free treat that satisfies your sweet tooth.
- Refreshing Flavor: The combination of chocolate and mint provides a delightful and invigorating taste that’s perfect for any occasion.
- Customizable: You can easily modify this recipe by using different nut butters or adding extra toppings to suit your preferences.
Ingredients
List of Required Ingredients
- 1 cup rolled oats
- 1 cup almond flour
- ½ cup pure maple syrup
- ½ cup natural peanut butter (or almond butter)
- ¼ cup unsweetened cocoa powder
- ¼ teaspoon fine sea salt
- ½ teaspoon peppermint extract
- ½ cup dark chocolate chips (preferably dairy-free)
- 1 tablespoon coconut oil
Suggested Substitutions
You can swap almond flour for coconut flour. Use cashew or sunflower butter in place of peanut butter.
Optional Add-ins
Try adding crushed nuts or seeds for extra crunch. Shredded coconut can add flavor and texture as well.

Step-by-Step Instructions
Prepping Your Ingredients
First, gather all your ingredients. You will need rolled oats, almond flour, cocoa powder, and fine sea salt. In a large mixing bowl, combine these dry ingredients. Stir well until they mix evenly.
Next, prepare your wet mixture. In another bowl, whisk together pure maple syrup, natural peanut butter, and peppermint extract. Mix until it’s smooth and well blended.
Assembling the Bars
Now, pour the wet mixture over the dry ingredients. Use a spatula or wooden spoon to stir. Keep mixing until it forms a sticky dough. This will be the base of your bars.
Prepare an 8x8-inch baking dish by lining it with parchment paper. Leave some paper hanging over the sides. This helps with easy removal later. Transfer your sticky mixture to the dish. Press it down evenly with a spatula or your hands.
Melting the Topping
For the topping, combine dark chocolate chips and coconut oil in a microwave-safe bowl. Heat the mixture in the microwave for 30 seconds. Stir after each interval until it’s fully melted and smooth. This will create a rich chocolate layer.
Carefully pour the melted chocolate over the pressed mixture in the dish. Use a spatula to spread it evenly. Aim for a smooth surface to make it look nice.
Setting the Bars
Now, it’s time to let the bars set. Refrigerate the baking dish for at least 2 hours. This helps the chocolate and mixture firm up. For best results, do not skip this step.
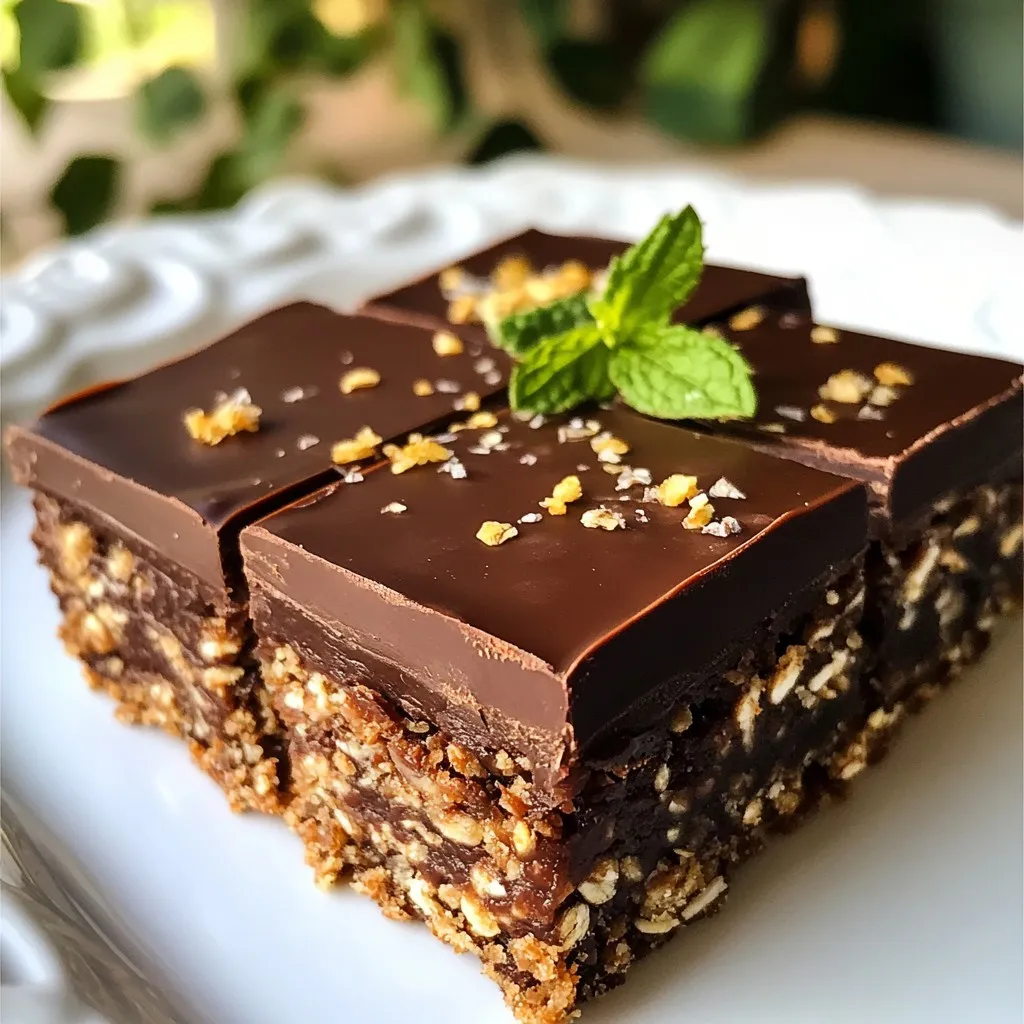
Once chilled, use the parchment paper to lift the bars out of the dish. Place them on a cutting board. Slice them into squares or bars of your desired size. Enjoy your homemade treat!
Tips & Tricks
Perfecting the Texture
To create a sticky mixture, make sure the wet ingredients blend well. Mix the maple syrup, peanut butter, and peppermint extract until smooth. This helps bind the oats and almond flour together. If your mixture feels too dry, add a little more maple syrup. For a smooth chocolate layer, melt the dark chocolate chips with the coconut oil slowly. Stir it often while heating. This way, it won’t burn, and it will stay glossy.
Serving Suggestions
For a lovely presentation, serve the bars on a decorative plate. Add fresh mint leaves on top or beside the bars. This adds color and a hint of freshness. When cutting, use a sharp knife to get clean edges. You can slice them into smaller squares for bite-sized treats or larger bars for a more filling snack.
Time-Saving Tips
You can make these bars ahead of time. They chill well in the fridge for up to a week. Store them in an airtight container to keep them fresh. If you have leftovers, keep them in the fridge. This way, they stay firm and tasty. If you want to make them last longer, consider freezing them. Just wrap each bar in plastic wrap for easy access later.
Pro Tips
- Chill the Bars: For the best texture, ensure the bars are refrigerated for at least 2 hours to allow them to set properly.
- Use Quality Cocoa: Choose a high-quality unsweetened cocoa powder for a richer chocolate flavor in your bars.
- Experiment with Nut Butters: Feel free to substitute the peanut butter with other nut butters like cashew or sunflower seed butter for different flavor profiles.
- Garnish Creatively: Enhance the visual appeal by garnishing with crushed nuts, sprinkles, or a sprinkle of sea salt on top of the chocolate layer.
Variations
Flavor Variations
You can change the flavor of your no-bake chocolate mint bars easily. Adding different extracts can give new tastes. For example, vanilla or almond extracts can make your bars unique. You can also infuse your bars with food-safe essential oils. Just a drop of peppermint or orange oil could create a fun twist.
Dietary Modifications
If you need gluten-free bars, swap the almond flour with coconut flour. This keeps the bars light and tasty. For vegan options, use maple syrup and almond butter. These simple swaps ensure everyone can enjoy this treat.
Additional Toppings
Get creative with your toppings! You can use different types of chocolate, like white or milk chocolate, to change the flavor. Crushed candies like peppermint or sprinkles can add a fun crunch. Try different combinations to make your bars even more special.
Storage Info
Best Storage Practices
To keep your no-bake chocolate mint bars fresh, store them in an airtight container. This prevents moisture and keeps the flavors intact. You can refrigerate them for a quick snack or freeze them for longer storage. If you freeze them, wrap each bar in plastic wrap first. This adds another layer of protection.
Shelf Life
These bars stay fresh in the fridge for about one week. If you freeze them, they can last up to three months. Always check for signs of spoilage. If they smell off or have a strange texture, it’s best to toss them.
Reheating Instructions
If your bars thaw and lose their firmness, you can restore them. Simply refrigerate them again for about 30 minutes. This helps them regain their solid texture. Enjoy your no-bake chocolate mint bars anytime, even if they need a little time in the fridge!
FAQs
Can I use a different type of sweetener?
Yes, you can try other sweeteners instead of pure maple syrup. Here are some great options:
- Honey
- Agave nectar
- Brown rice syrup
Each sweetener can change the flavor a bit. Honey adds a nice floral note. Agave is milder and less sticky. Brown rice syrup is thick and has a unique taste. Adjust the amount as needed, since sweetness levels vary.
How do I prevent the chocolate from seizing?
To stop chocolate from seizing, use gentle heat. Follow these tips:
- Use a microwave-safe bowl.
- Microwave in short bursts, about 30 seconds.
- Stir between each burst until smooth.
- Add a little coconut oil for a smoother melt.
Don’t let water touch the chocolate. Even a drop can cause it to clump. If this happens, you can sometimes save it by adding a bit of warm cream.
How do I know when the bars are set?
You can tell the bars are set by checking a few signs:
- The chocolate layer should feel firm to the touch.
- The base should not be sticky.
- If you press lightly, it should hold its shape.
Check after two hours in the fridge. If they are still soft, leave them for another hour. Once set, they will cut easily into bars or squares.
You now have a complete guide to making delicious chocolate peppermint bars. We covered all the ingredients, from oats to chocolate chips. I shared key steps for prep, mixing, and setting your bars. You learned tips for perfect texture, serving ideas, and smart storage options. These bars can fit many diets with easy swaps. Enjoy experimenting with flavors and sharing your creations. Your new tasty treat await