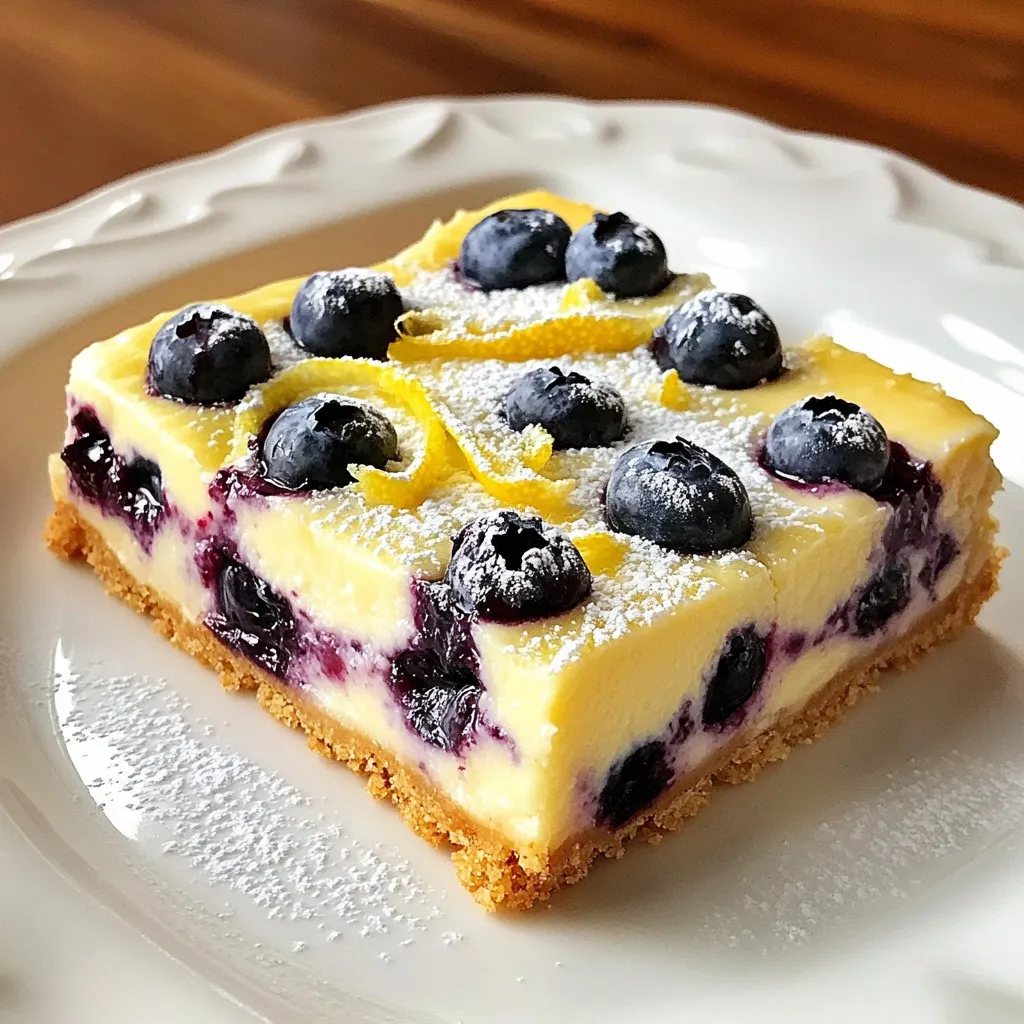
Looking for a delicious treat that’s easy to make? Let’s whip up some Lemon Blueberry Cheesecake Bars! These bars are creamy, zesty, and bursting with juicy blueberries. Whether you’re hosting a gathering or just craving something sweet, this recipe is a sure crowd-pleaser. Get ready to impress your family and friends with this simple yet tasty dessert that everyone will love! Let’s dive into the ingredients and start baking!
Why I Love This Recipe
- Bright and Refreshing Flavor: The combination of lemon and blueberries creates a delightful balance of tartness and sweetness that is simply irresistible.
- Easy to Make: With straightforward steps and minimal prep, these cheesecake bars are perfect for both novice and experienced bakers.
- Perfect for Any Occasion: Whether it's a summer picnic or a holiday gathering, these bars are a crowd-pleaser that fits any event.
- Make-Ahead Delight: These cheesecake bars can be made in advance and chilled, making them a convenient dessert option for busy days.
Ingredients
Fresh Ingredients List
- 16 oz cream cheese, softened
- 1 ½ cups fresh blueberries, rinsed and drained
- Zest of 1 large lemon
- ¼ cup freshly squeezed lemon juice
- 2 large eggs, at room temperature
Pantry Staples Needed
- 1 ½ cups graham cracker crumbs
- ½ cup unsalted butter, melted
- 2 tablespoons granulated sugar
- ¾ cup granulated sugar
- 1 teaspoon pure vanilla extract
Optional Garnishes
- Powdered sugar for dusting
- Additional fresh blueberries
- Lemon slices for decoration
Gathering these ingredients is the first step to making your lemon blueberry cheesecake bars. Using fresh blueberries gives a great taste. The zest and juice from the lemon add a bright flavor. The cream cheese provides the rich and smooth texture you want in a cheesecake. The graham cracker crumbs form a sweet and crunchy base. Mixing in the right amounts of sugar balances the tartness of the lemon. Don't forget to have some powdered sugar on hand for a nice finish!

Step-by-Step Instructions
Preheating and Preparing the Baking Dish
Start by preheating your oven to 325°F (160°C). Grab an 8x8 inch baking dish. Line it with parchment paper, leaving some paper hanging over the edges. This helps you lift the bars out later.
Making the Crust
In a medium bowl, mix together 1 ½ cups of graham cracker crumbs, ½ cup of melted unsalted butter, and 2 tablespoons of granulated sugar. Stir until the mixture looks like wet sand. Press this mixture firmly into the bottom of your lined baking dish. Make sure it is even and compact.
Preparing and Baking the Cheesecake Filling
In a large bowl, use an electric mixer to beat 16 oz of softened cream cheese with ¾ cup of granulated sugar. Mix until it is smooth and creamy, about 2-3 minutes. Add in 2 large eggs, one at a time. Mix well after each addition. Now, add the zest of 1 lemon, ¼ cup of freshly squeezed lemon juice, and 1 teaspoon of vanilla extract. Mix until combined.
Gently fold in 1 ½ cups of fresh blueberries using a spatula. Be careful not to crush them. Pour this cheesecake filling onto your cooled crust. Spread it out evenly. Bake for 25-30 minutes or until the edges set but the center is slightly jiggly.
Once baked, allow the bars to cool at room temperature. Then, transfer them to the fridge. Chill for at least 4 hours or overnight. This helps the cheesecake set nicely. When ready, lift the bars out using the parchment paper and cut them into squares. Enjoy!
Tips & Tricks
How to Achieve the Perfect Cheesecake Texture
To get a smooth and creamy texture, use room temperature cream cheese. Cold cream cheese will clump up and ruin your mix. Beat it with sugar until it’s lump-free. This takes about 2-3 minutes with an electric mixer. Add eggs one at a time. Mix well after each egg to ensure a creamy blend. Zest and juice your lemon right before adding for the best flavor.
Best Practices for Folding in Blueberries
When folding in blueberries, be gentle. Use a spatula or wooden spoon. Start from the bottom and work your way up. This helps keep the blueberries whole. Crushing them makes the filling too watery. Aim for even distribution without mashing them. This keeps your bars looking beautiful and colorful.
Cooling and Chilling for Optimal Flavor
Cooling and chilling are key steps. After baking, let the bars cool at room temperature. This prevents condensation that can make them soggy. Once cool, cover and chill in the fridge for at least 4 hours. Overnight is best! This helps the flavors meld and sets the cheesecake perfectly. The longer you wait, the better the taste!
Pro Tips
- Use Room Temperature Ingredients: Ensuring your cream cheese and eggs are at room temperature will help achieve a smoother cheesecake filling without lumps.
- Don't Overmix: When incorporating the eggs and blueberries, mix just until combined to avoid overworking the batter, which can lead to a dense texture.
- Chill Overnight: For the best texture and flavor, allow the cheesecake bars to chill overnight before serving. This helps them firm up nicely.
- Garnish for Presentation: Enhance the visual appeal by garnishing with additional fresh blueberries and lemon slices when serving, adding a vibrant touch to your dessert.
Variations
Substitutions for Cream Cheese
If you want a twist on the classic taste, try using mascarpone cheese. It gives a rich, creamy flavor. You can also use Greek yogurt for a lighter option. It adds tang while cutting some fat. Just remember, the texture may change a little, but the bars will still taste great.
Alternative Crust Options
Graham cracker crumbs are a favorite, but you can change it up! Use crushed cookies like Oreos or gingersnaps for a different flavor. If you prefer a gluten-free option, almond flour or gluten-free cookie crumbs work well. Just mix with melted butter and press it into the dish.
Different Flavor Profiles to Try
Want to mix things up? Add chocolate chips or nuts to the filling. You can also try other berries like raspberries or strawberries for a fruity twist. For a fun flavor, use lime juice instead of lemon juice. Each change gives a new taste adventure while keeping the bars delicious!
Storage Info
Best Ways to Store Leftovers
To keep your lemon blueberry cheesecake bars fresh, store them in an airtight container. This helps prevent drying out and keeps them tasty. You can also place parchment paper between layers to avoid sticking. Make sure to seal the container tightly to lock in moisture and flavor.
How Long Do They Last in the Fridge?
When stored correctly in the fridge, these cheesecake bars can last about 5 days. Just remember to keep them covered to maintain their creamy texture. If you notice any change in smell or texture, it’s best to toss them for safety.
Freezing Suggestions for Cheesecake Bars
For longer storage, you can freeze these cheesecake bars. First, cut them into squares, then wrap each piece in plastic wrap. Place the wrapped bars in a freezer-safe bag or container. They can last up to 2 months in the freezer. To enjoy, thaw them overnight in the fridge before serving. This keeps the taste fresh and delicious!
FAQs
Can I use frozen blueberries instead of fresh?
Yes, you can use frozen blueberries. They work well in this recipe. Just make sure to thaw and drain them before adding to the filling. This helps keep the mixture from getting too watery. You may notice that frozen blueberries break apart more easily. This is okay, as they will still taste great in your cheesecake bars.
What can I substitute for graham cracker crumbs?
You can use crushed cookies like Oreos or vanilla wafers. Another option is using crushed nuts mixed with a bit of sugar and butter. This gives a nice flavor and texture. Just ensure that the crumbs form a solid crust when pressed into the baking dish.
How do I know when the cheesecake is properly baked?
The cheesecake is done when the edges are set, but the center is still slightly jiggly. This means it will firm up as it cools. Avoid overbaking, as this can lead to a dry texture. After baking, let it cool completely before chilling in the fridge. This helps it set and improves the flavor.
Making cheesecake bars is fun and easy. You learned about fresh ingredients, pantry staples, and optional garnishes. I walked you through step-by-step instructions on preparing the dish. Helpful tips ensure the perfect texture and flavor. You also discovered how to store leftovers and answered common questions.
Keep experimenting with variations to make this dessert your own. Enjoy every bite, and share with friends! Your cheesecake journey has just begu
<!-- /wp:freefo